The following are several reasons you may want this alternative method for installing OpenOffice.org on Windows:
- You need to install OpenOffice.org without local administrator rights.
- Your system administrator has set policies to prevent this installation.
- You need to install OpenOffice.org without the system integration (file associations and menu shortcuts).
- You need to install OpenOffice.org on portable media (such as a USB disk). Roll our own Portable OpenOffice.org!
- You need to install multiple versions of OpenOffice.org in parallel. For example, you can install and simultaneously run versions 2 and 3.
- The standard installation method fails.
- You need to perform a network installation on a server.
If none of these apply to you, you may instead wish to use the standard installation.
Background
OpenOffice.org version 2 and later use a two-phased installation:
- The Nullsoft Installer .exe unpacks several files to a temporary folder on the desktop. Then, it automatically starts the next step.
- The Microsoft Windows Installer performs the actual installation.
A benefit of this system is that the Nullsoft Installer allows a much smaller download while the Windows Installer is Windows' native and preferred installation system (especially nice for installing through Group Policy and Active Directory).
OpenOffice.org installs simply without significant registry changes or placing files outside of its Program Files directory: this makes the OpenOffice.org application easy to relocate to different folders—even on different computers.
Procedure: Method 1
To perform the alternative installation using only one computer, follow these steps to perform what is called a "Network Installation." Don't worry about the "Network" name if you do not use a network. The end result will be a "portable" installation with any system registration (file associations, shortcuts, etc.). Here's how:
- Download OpenOffice.org. Depending on the version, language, and JRE option, the file will have a name like OOo_3.0.1_Win32Intel_install_en-US.exe.
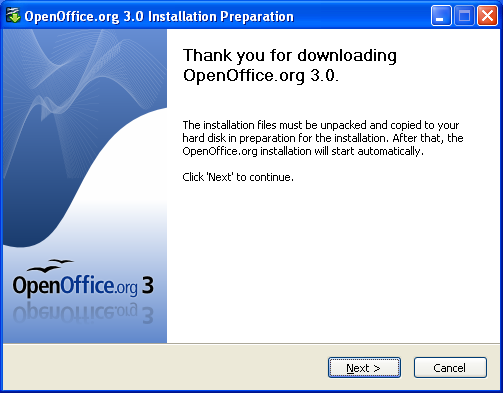
- Run the downloaded file.
- Click Next

and then Unpack.
- Click Cancel

then Yes
then Finish.
- On your desktop, open the newly-created folder which has a name like OpenOffice.org 3.0 (en-US) Installation Files (which varies depending on the OpenOffice.org version).
- While viewing the folder, click Tools > Folder Options.
- Click the View tab.
- Uncheck Hide extensions for known file types. (If it was already unchecked, leave it unchecked.)

- If you are prompted to apply settings to all folders, click No

- Click OK to close Folder Options.
- Click the File > New > Text Document.
- Name the new file install.bat. Windows may warns you: "If you change a file name extension, the file may become unusable. Are you sure you want to change it?" Click Yes to accept the warning.

- Right click on install.bat and choose Edit.
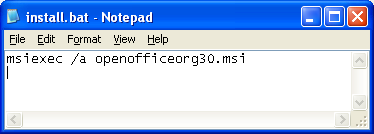
- Type the following in the file:
msiexec.exe /A openofficeorg30.msi
NOTE: The filename openofficeorg30.msi may change slightly depending on your OpenOffice.org version. Use the name of whichever filename you actually have. In case Windows is hiding filename extensions, look for the one file with type Windows Installer Package. - Save the file and close Notepad.
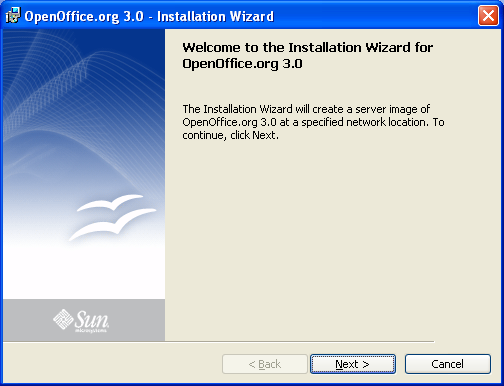
- Run the batch file (by double clicking on it).
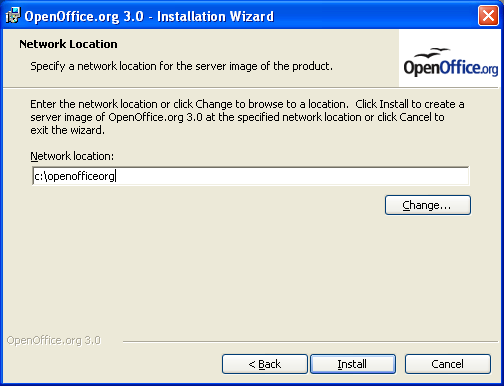
- Follow the instructions in the installation program. If necessary, adjust the installation path. Whichever installation path you choose, add something like OOo to the end of it. For example, instead of just C:\, use c:\OOo to keep all the files organized.


Now OpenOffice.org is installed. There are no file associations or menu shortcuts, so you must start the application directly. If you installed it in (for example) C:\OOo, then run C:\OOo\Program\SOffice.exe. Then, there are two ways to open existing documents.
- Click File > Open, or
- Drag the file and drop it on the blank OpenOffice.org window.
Procedure: Method 2
If you have local admin privileges on computer X but not computer Y, you can use this procedure.
- Install OpenOffice.org normally on computer X.
- Copy the OpenOffice.org installation folder (typically something like C:\Program Files\OpenOffice.org 3.0) from computer X to computer Y.
Procedure: Uninstall
To uninstall methods 1 or 2, simply delete the folder with the application.
Procedure: Method 3
Download and use Portable OpenOffice.org.
Network Installation
Did you actually want to do a network installation (also called an administrative installation)?
- Follow Method 1 (above) to install OpenOffice.org centrally on a server.
- On each desktop, run the openofficeorg30.msi created in the installation target directory. This step installs the program files locally, registers file associations, creates shortcuts, etc.
Procedure: Silent Installation
A silent installation installs OpenOffice.org without user interaction, so it can run unattended from a batch file.
- Start with the same procedure as method 1 until the point of creating the batch file.
- Instead, make the following the contents of the batch file:
msiexec.exe /qb /norestart /i openofficeorg30.msi - Run the batch file
Applies to
- OpenOffice.org 3
For OpenOffice.org 2 see, "Secrets of alternative installation on Windows") - Microsoft Windows XP (and probably Vista but not tested)

15 comments:
Thank you very much for these useful hints!
Just a question: what's the "ause" parameter for?
Bye,
cobo
Cobo: Oops, I had the 'pause' command in there for debugging, but I am removing it now for publication.
I believe you have an error here with the comment about running the msi on the worjkstation to create file associations - oo3never creates any file associations!?
Anonymous: Of course OpenOffice.org 3 creates file associations! First, it creates file associations for OpenDocument Format files (odt, ods, odp, etc). I see OOo bug 96594: MSOffice file association has people upset; however, I just ran the silent install on this page, and MSO files (doc, docx, xlsx) are associated.
Please (puh-leeze!) do a similar rundown for installing 3 and higher under Ubuntu.
I moved to a new computer, and didn't even want the 2.4 that came with my Intrepid install. But I got careless, didn't uninstall it before putting 3 on, and I never have managed to get the desktop integration working. I'm not sure how to cleanly uninstall everything, but keep my config files!, and start over. sudo apt-get --purge dumps everything, --remove doesn't seem to dump enough.
It'd be nice if Sun moved into the 21st century and established a repository Ubuntu users could add to Synaptic, or at least started providing .deb files that installed, including desktop integration, with one click, like Firefox!
quixote.
Thank you for this post.
But one question: Does it create an entry in C:/Documents and settings/... or read/modify an existing entry?
bye
None of these methods should touch "C:/Documents and settings/" during installation, but most do during application usage. I think the exception is Method 3 (Portable OpenOffice.org) which modifies OOo to write its settings elsewhere.
Almost worked... On the very last step (running the .bat file), I got 'Error 1925. You do not have sufficient privileges to complete this installation for all users of the machine.' I only have limited access to the machine (my user's folder, including the desktop). I also tried installing to a USB drive so I could drag it to a better location afterward. Any ideas? I'll probably just use Method 2.
Joel: You can use
msiexec.exe /A openofficeorg23.msi ALLUSERS="" and it will work.
I used method 1 with OOo 3.1 so I could do an install without admin rights. However, that doesn't work. I did include the ALLUSERS="" option, so the install went ok; but when starting any program, the message about the configuration error appears.
The OOo readme suggests that you need to download a Visual C++ redsitributable package from Microsoft. These files (msvc*90.dll) are indeed not installed. I did download it, but it turns out that you need admin rights to install the package... I tried copying the files myself from "...\OOo\Windows\system32" to "C:\Windows\system32": no access. I also tried including "...\OOo\Windows\system32" to the PATH var. No luck :-(
I'm now using the portable apps method. It's an older version, but it'll have to do...
Regards,
Gidi
Gidi: What if you copy msvcr90.dll to the \program\ directory where soffice.exe is?
still the same... I think it needs all the stuff in winsxs as well.
For those having problems with the network install not working, it is most likely because the msvc*90.dll's are missing. In the OpenOffice.org initial download, after the files are extracted look in the installation folder for a folder called "redist". This is to install the c++ redistributale's. This will fix the missing dll's.
If you do not have the "redist" folder in your OOo download you can get the needed install file at: http://www.microsoft.com/downloads/details.aspx?familyid=9B2DA534-3E03-4391-8A4D-074B9F2BC1BF
Hope this helps.
Richard, indeed, the msvc*90.dll libraries are not installed on this public computer. (It has older versions, up to 7.1); however, I need administrator rights to install the package (vcredist_x86.exe) included in the "redist" folder that you mention.
Copying the .dlls to C:\windows\system32 doesn't work (Access denied).
Hello,
I have used the method described here but I get the following message:
"error 1925. You do not have sufficient privileges to complete this installation ........"
and the program is not installed.
Before it I tried to install using the method described for OOo2X. There it could install but could not run.
Thank you in advance for any hint
Ibrahim
Post a Comment